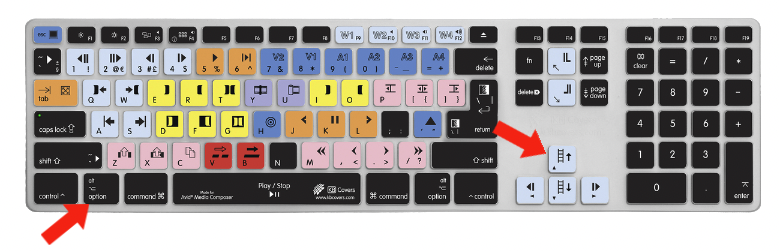
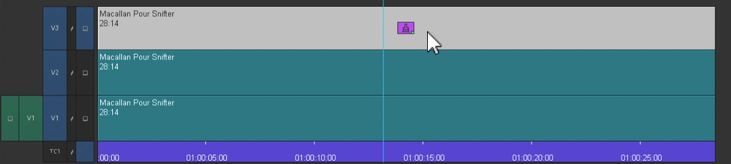
To start, select a clip segment in the timeline and then hold down the option/alt key and press the Up Arrow Twice.
Media Composer Shortcut Skin
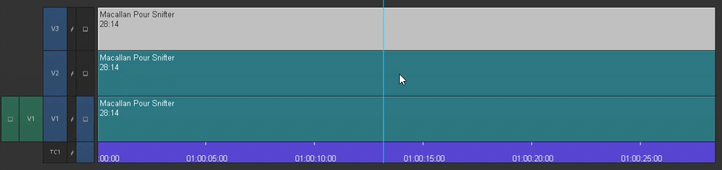
This will duplicate the clip segment on top of itself two times.
Three Duplicate Avid Media Composer Layers
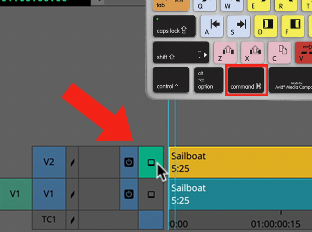
Next, make sure the V3 track is turned on, and the Monitor Icon is placed onto the V3 Track.
V3 Monitor Icon
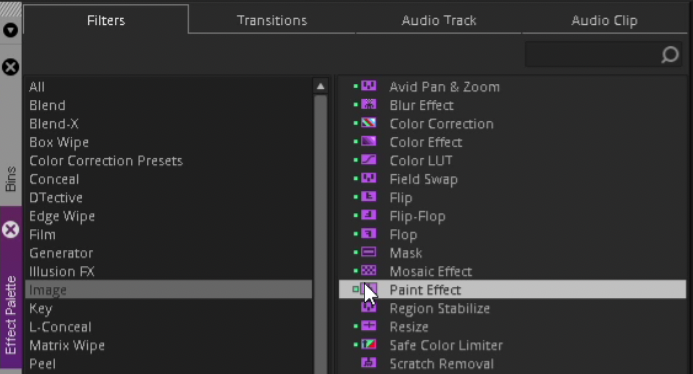
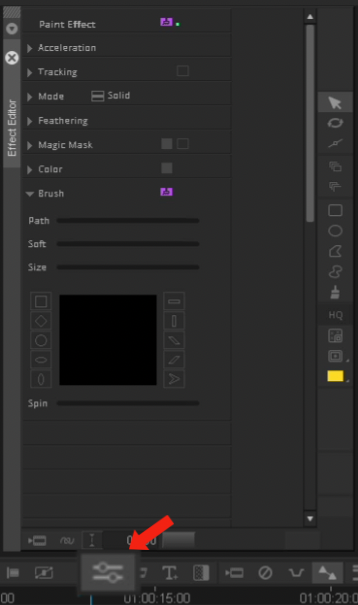
Navigate to Effects Palette and find the Paint Effect with the Image Category.
Image – Paint Effect
Place the Paint Effect onto the V3 Segment within your sequence.
Media Composer Paint Effect on V3 Segment
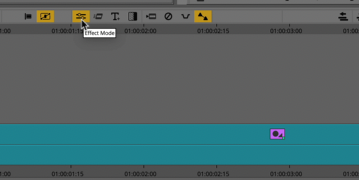
Then enter into Effects Mode. This will bring forward the Effects Editor Window.
Media Composer Effects Editor Mode Icon
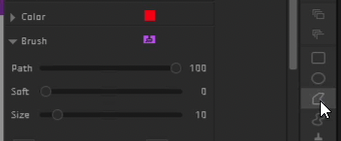
Navigate to the Effect Editor Window and click on the Poly Tool.
Media Composer PolyTool within Effect Editor Window
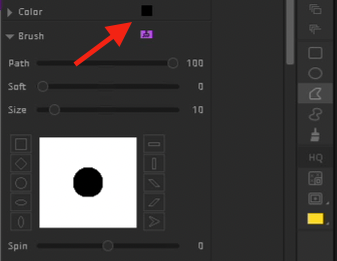
Change the Color of the Poly Tool Mask from Red to Black
Matte Color
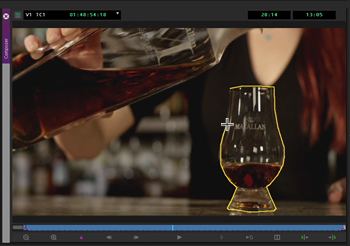
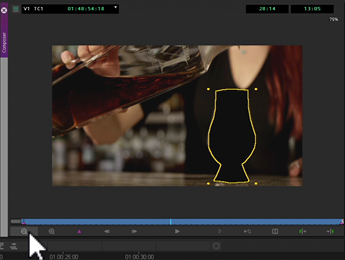
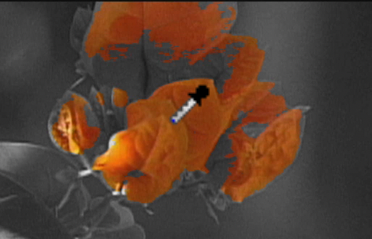
Draw a black mask around area to be cloned.
Using the Poly Tool within MC Paint Effect
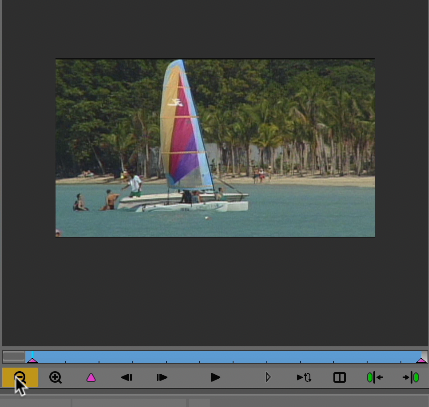
Then, click on the reduce button in the right corner (or CMD/CTRL K) so you can see outside to visible picture area within the Composer Window.
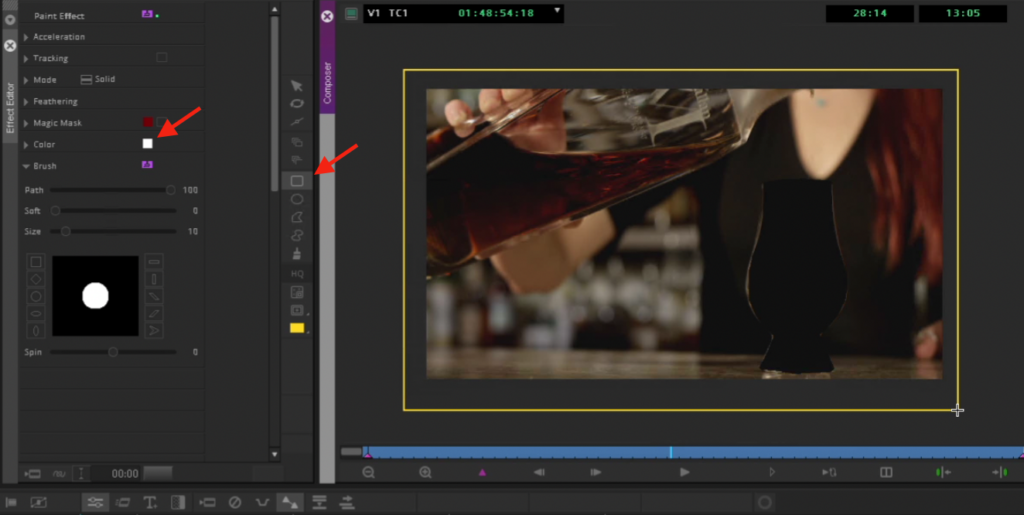
Navigate back to the Effect Editor Window and click on the Rectangle Tool. Change the color of the Rectangle Tool to White. Draw a white square around the entire visible picture area.
Draw White Mask
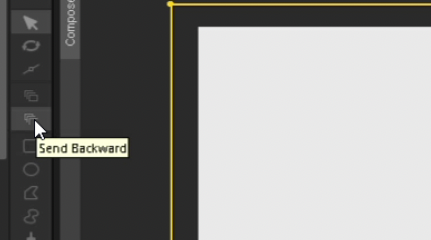
After you Draw the Mask, it will cover over the Black Shape that you made earlier. Click on the Send Backward button within the Effect Editor Window
Send Backward
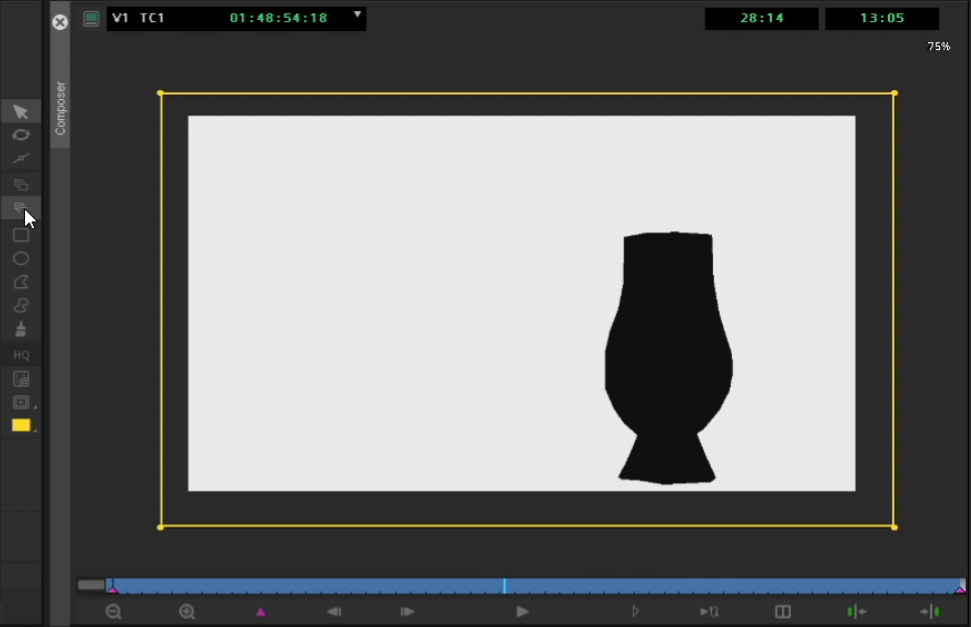
The end result with be a Black and White Matte.
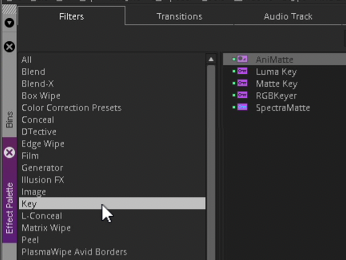
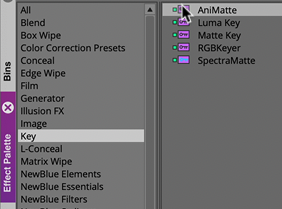
Navigate back to the Effect Palette, and find the AniMatte Effect within the Key Category.
AniMatte Effect in Media Composer
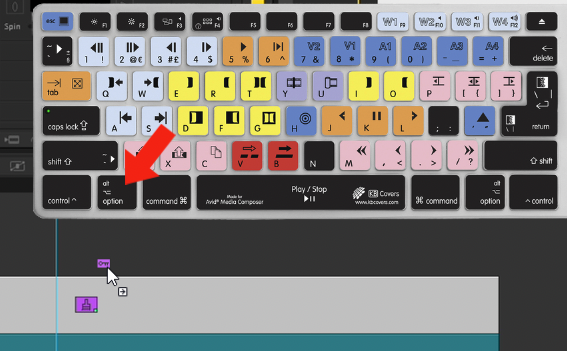
Hold down the ALT/OPTION key and drag the AniMatte effect onto the clip segment that’s on V3.
Alt/Option Drag AniMatte Effect
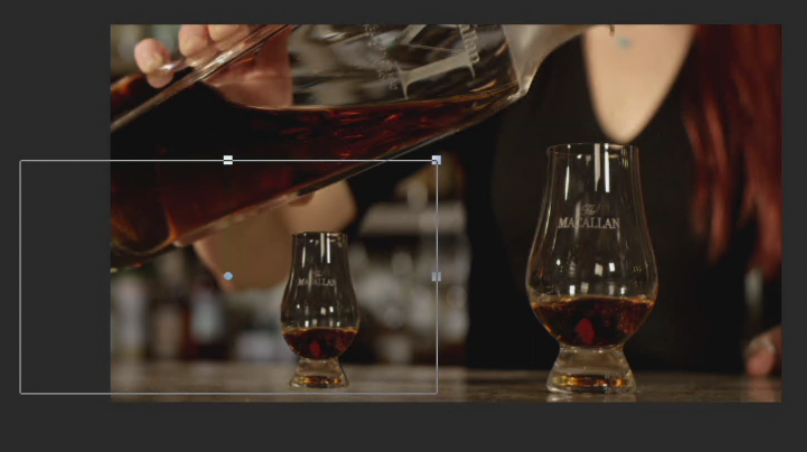
The last step is to resize your Matte within the Composer Window. That’s it!
Resize Matte Key
If you enjoyed this tutorial, please subscribe to our YouTube Channel.
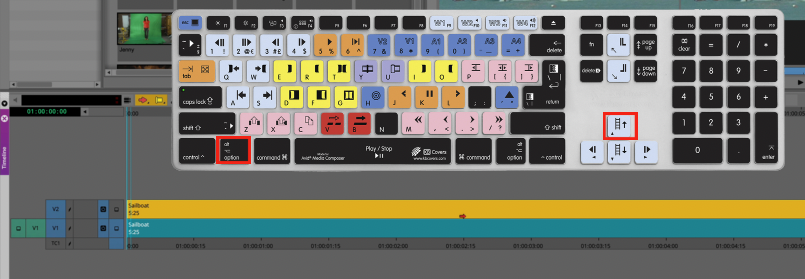
Start by duplicating a clip segment layer by holding down the option/alt key and pressing the UP ARROW key. That will duplicate the clip segment on V1 onto V2.
Duplicate Clip Segment – Avid Media Composer
Then, command click on the V2 Monitor Icon to Solo the Layer.
Command Click on Monitor Icon to Solo the Track
Drag the Animate Effect from the Effect Palette onto the V2 Clip Segment
Media Composer Effect Palette – Animate Effect
Then enter into Effects Mode.
Media Composer Effects Mode
Next, click on the Reduce Icon to zoom out of the visible area within the Record Side of the Composer Window.
Zoom Out of Visible Area of Composer Window – Record Side
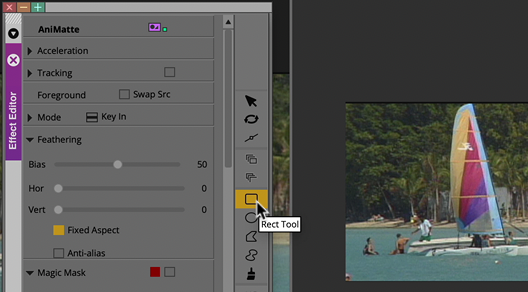
Click on the Rectangle Tool within the Effect Editor Window.
Rectangle Tool within Effect Editor Window
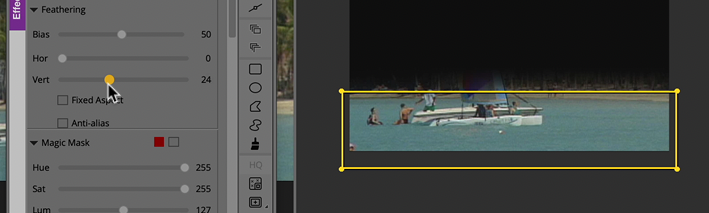
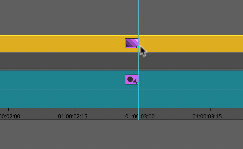
Draw a Rectangle Mask around the water area and adjust the vertical feathering to hid the hard edge of the masked area.
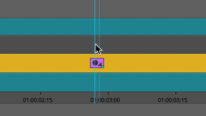
Double click on the Animate Effect located on the Clip Segment within the timeline. The Timeline will expand with 2 additional tracks. This is called expanded nesting.
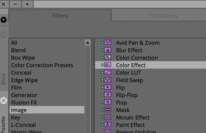
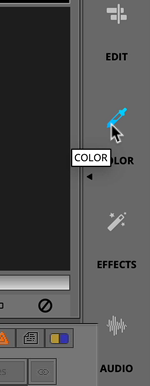
Within the Effect Palette, navigate to the Image Category and look for the Color Effect.
Color Effect within Avid MC
Drag the Color Effect onto the V1.2 track which is nested within the V1 track.
Nest Color Effect into Animate Effect
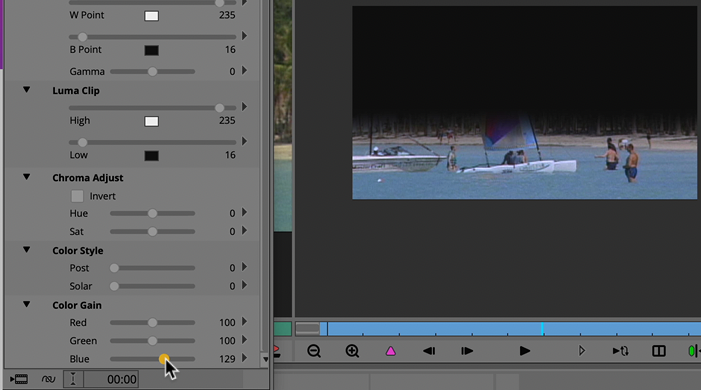
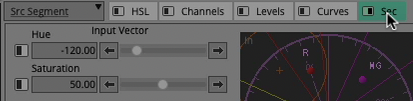
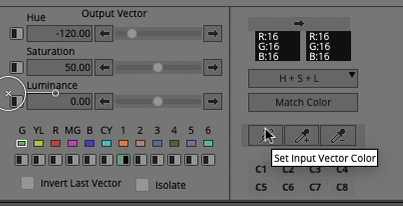
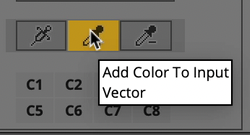
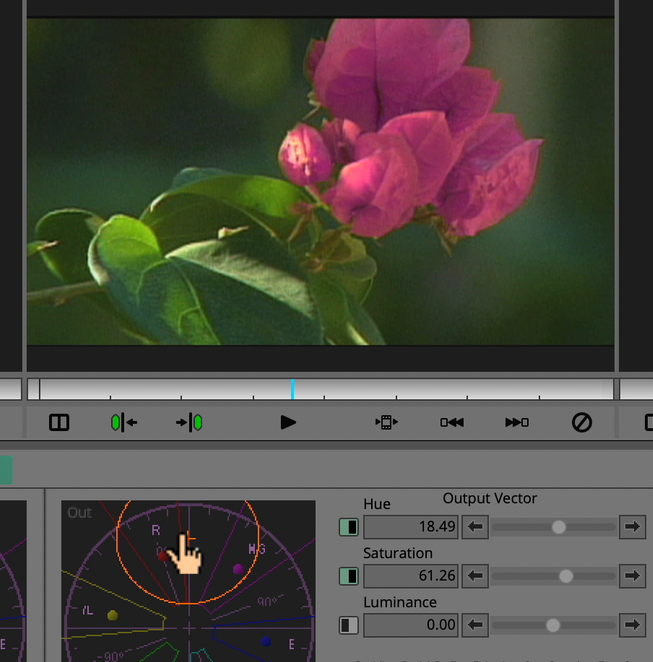
Then, adjust the blue parameter within the Color Gain category.
Adjust Color Gain for Blue
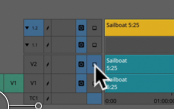
You can now umute the V2 track and place the monitor icon icon the V1 track.
Monitor V1 Track
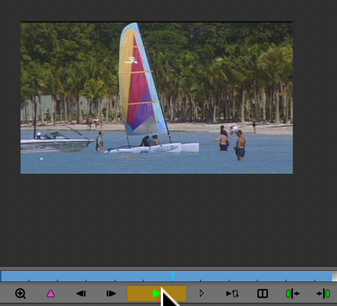
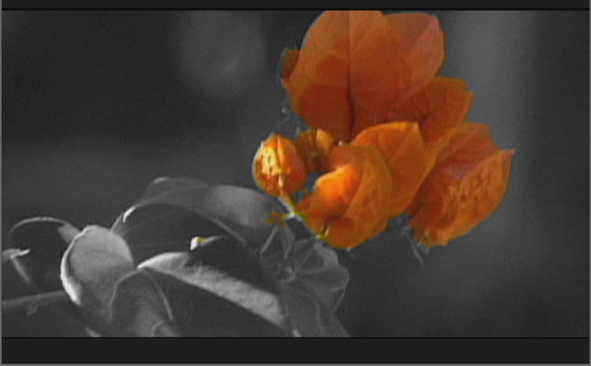
That’s it!, now you have an isolated matte (mask) where you can adjust the color of the shape independently from the rest of the video segment.
With Media Composer Ultimate, is easy to isolate colors and/or change color hues without having to export to DaVinci Resolve, After Effects, or another third party software product.
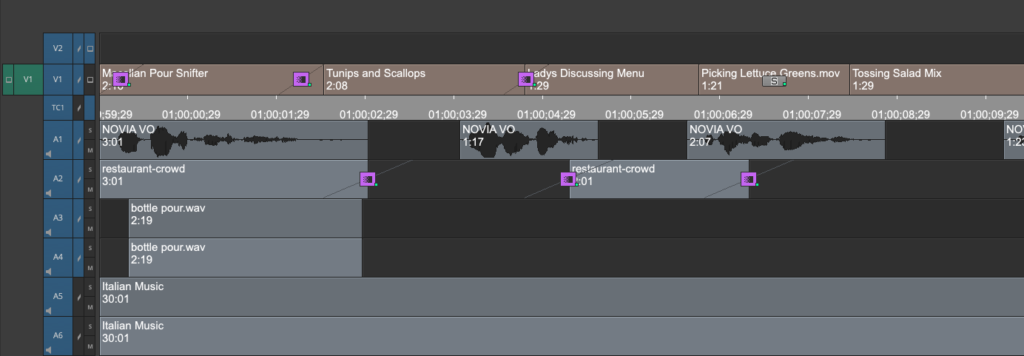
It’s easy to add filler to then end of an Avid Media Composer Sequence so you can match your sequence to a specific amount of time.
Adding Filler at the End in Avid Media Composer
This is VERY useful for traditional ‘broadcast’ shows or commercials that need to be a specific length.
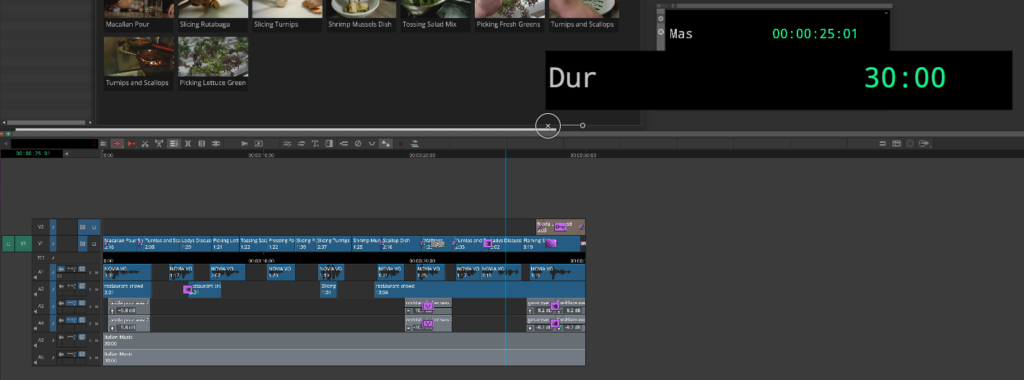
In this example, I already have a show that runs for 30 seconds, and I want to create a 60 second version of it.
Avid Media Composer 30 Sec Sequence – Adding Filler
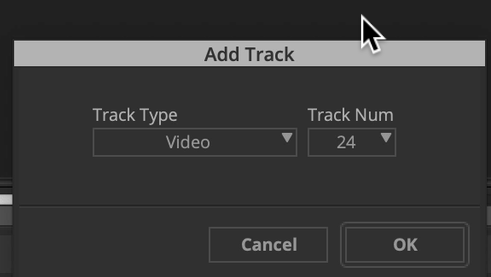
Hold down the option and/or alt key and right click in the timeline area to create a new video new track.
In doing so, this will allow you to add a new empty track with any track number assigned to it.
Add Higher Level Video Track – Media Composer
Use a track number that will exceed the normal amount of tracks that you typically use in your sequence.
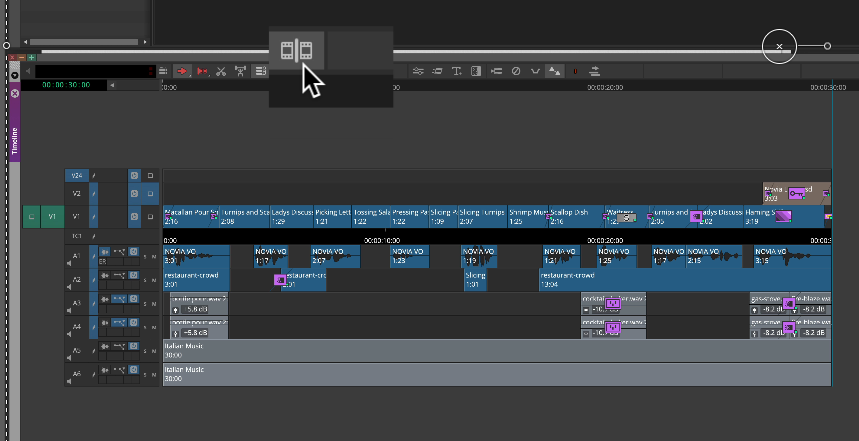
Navigate to the very end of your sequence.
Within the new empty track, make sure the new empty filler track is active.
Press the Add Edit Function. Don’t worry, nothing will appear to happen.
Add Edit at End of Avid Media Composer Sequence to Add Filler
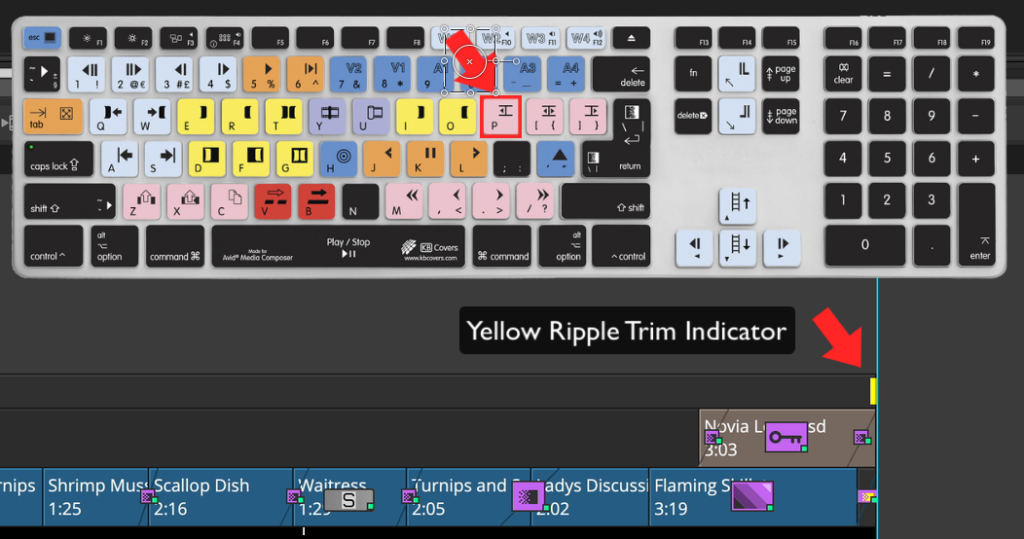
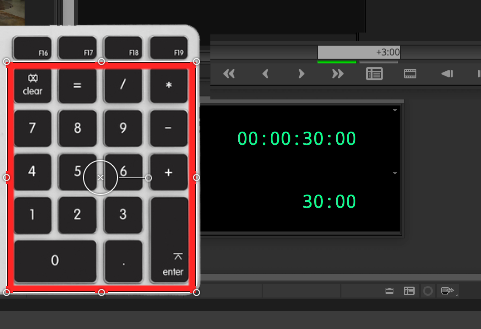
Next, Press the P key on your keyboard. This will enter into ripple trim mode on the left side of an invisible edit point.
On your keyboard keypad, type +30:00 or whatever value you want to add as filler to the end of your sequence.
The value will appear at the bottom of your composer window.
Use KeyPad to Enter Filler Value in Avid Media Composer
If you do not have a full-size keyboard, press the CTRL key rapidly twice. Then you can use the regular numbers below the function keys on a truncated keyboard.
Now, you will want to lock the filler track. Right click new , and choose lock track.
Lock Avid Media Composer Track
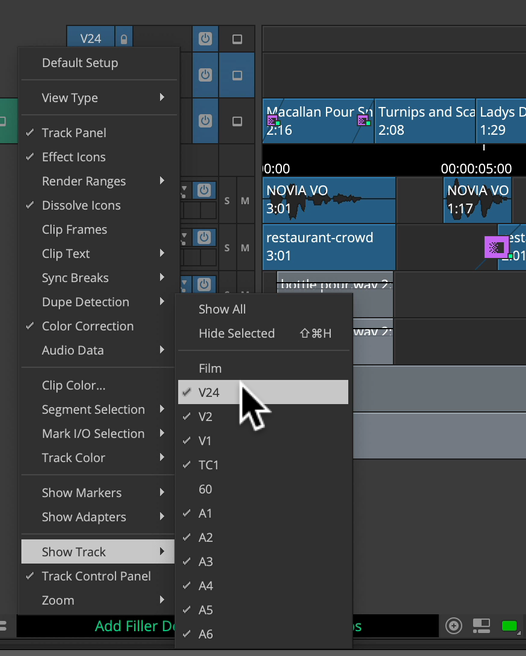
Navigate to the timeline fast menu, and you can choose to hide the track if you choose.
Hide Avid Media Composer Track
So now, when you zoom out of your sequence, you have a fixed timeline that represents the exact amount of footage you will need to complete the spot.
There are a couple of new features that seasoned Avid Editor’s will enjoy which include:
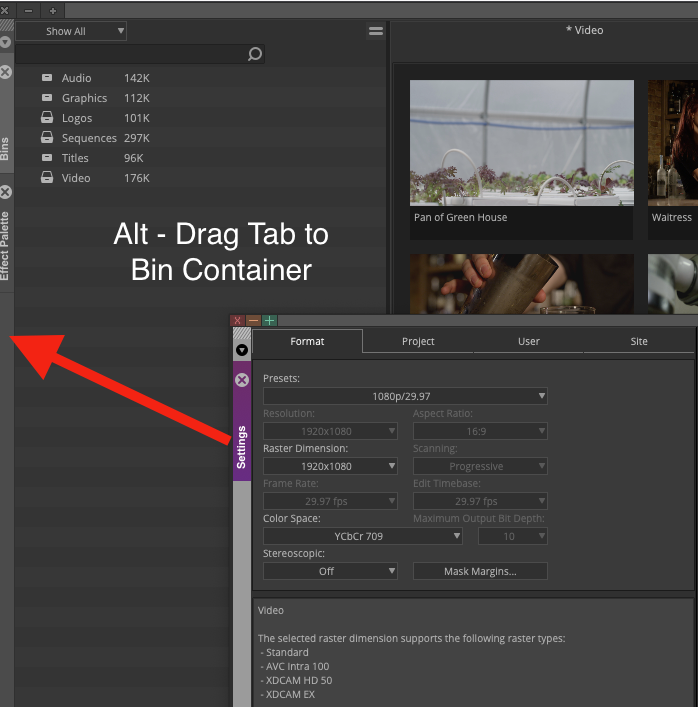
The ability to Dock the ‘settings’ window to other interface windows. Hurray! another time saver! For those of you new to Avid’s new 2020 interface, the old ‘project’ window is called the ‘settings window’.
Media Composer Settings Tab
It’s now much easier lasso multiple clips when you are in frame view. The bin will automatically scroll down if you have additional clips that don’t fit within the window size.
For upgrades like this, I recommend that you download updates directly from Avid’s Download Center instead of using Avid Link. Avid’s download center provides access to previous versions in case you need to uninstall and go back to a previous version.
If you’re interested in learning the new Avid Media Composer 2020.6 Interface, and/or becoming a certified Media Composer user, please give me a call directly at 866-566-1881. -John (Certified Avid Trainer for 25 years)
Look for more tips and tricks like this, as GeniusDV now offers Certified Pro-Tools training that can be done remotely! Training sessions are conducted in a LIVE one-on-one environment.
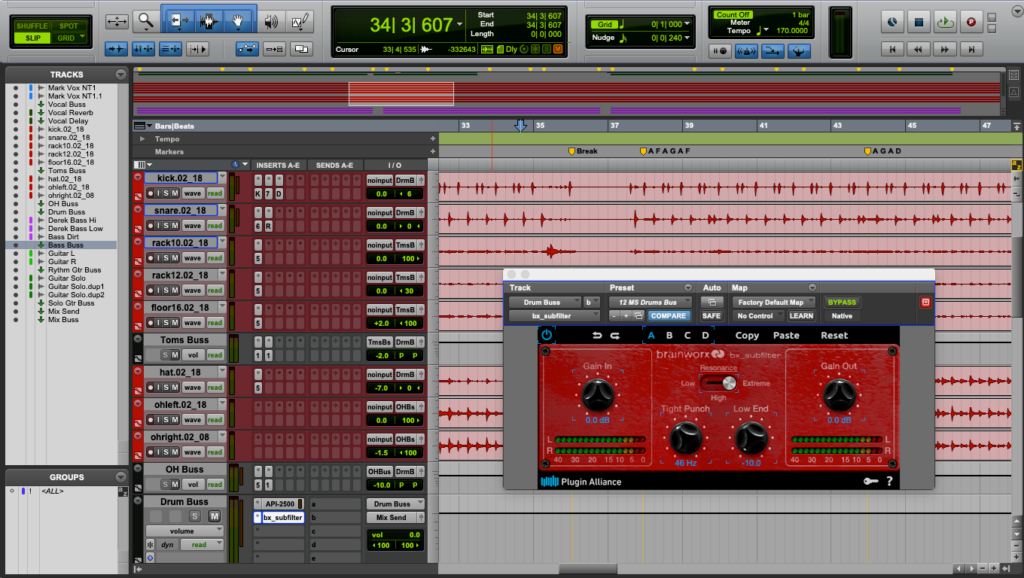
Polishing up your mix’s low end can be tricky. Bass DI tracks can sound mushy, and kick tracks can lose their “Smack” Sometimes everything below 100Hz can become such an undifferentiated soup of noise that you just don’t know where to start! Why not start here ?
The free Pro Tools bx_subfilter is just the ticket for adding clarity and definition to tracks that have troublesome low frequencies. There are lots of expensive and complicated EQ plugins, but when it comes to controlling your low end, the bx_subfilter is unique for its ease and simplicity.
With just a few quick adjustments to its four-knob interface, you can breathe new life into those 808s that have been muddying your mix.
I use it on drum busses to control the monster drum sounds i create, this plug in is awesome! – Derek Hughes – Avid Certified Pro Tools Instructor.
BX_SUBFILTER DEMO IN PRO TOOLS
Don’t forget that most Pro Tools plugins are directly compatible within Avid Media Composer. In Avid MC, they will show up within your Audio Track Effects. The same license will work with both Pro Tools and Media Composer assuming you have Avid MC and Pro-Tools installed on the same system.
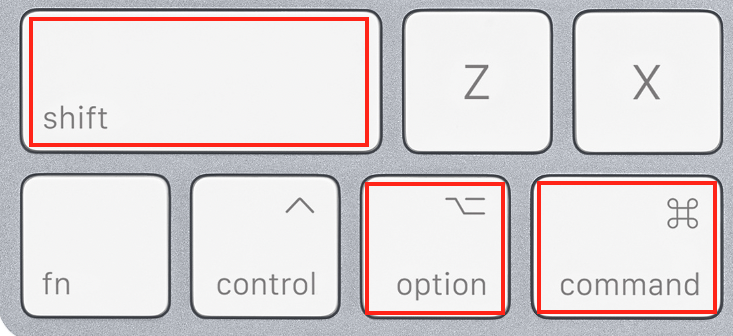
To reset Photoshop back to it’s default preference settings hold down the following keys right before launching the application
MAC: COMMAND + OPTION + SHIFT
HOLD DOWN MAC MODIFIER KEYS TO RESET PHOTOSHOP WHILE LAUNCHING SOFTWARE
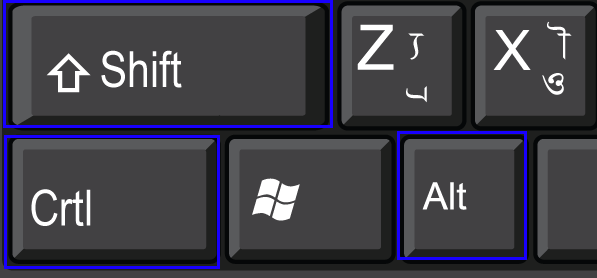
PC: CONTROL + OPTION + SHIFT
HOLD DOWN PC MODIFIER KEYS TO RESET PHOTOSHOP WHILE LAUNCHING SOFTWARE
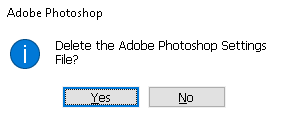
A dialogue box should immediately appear before Photoshop continues to Launch.
Keep in mind this will reset ALL your Photoshop preferences. This is no UNDO. However, i’ve found it is sometimes necessary if some crazy preference got changed preventing you from continuing forward.
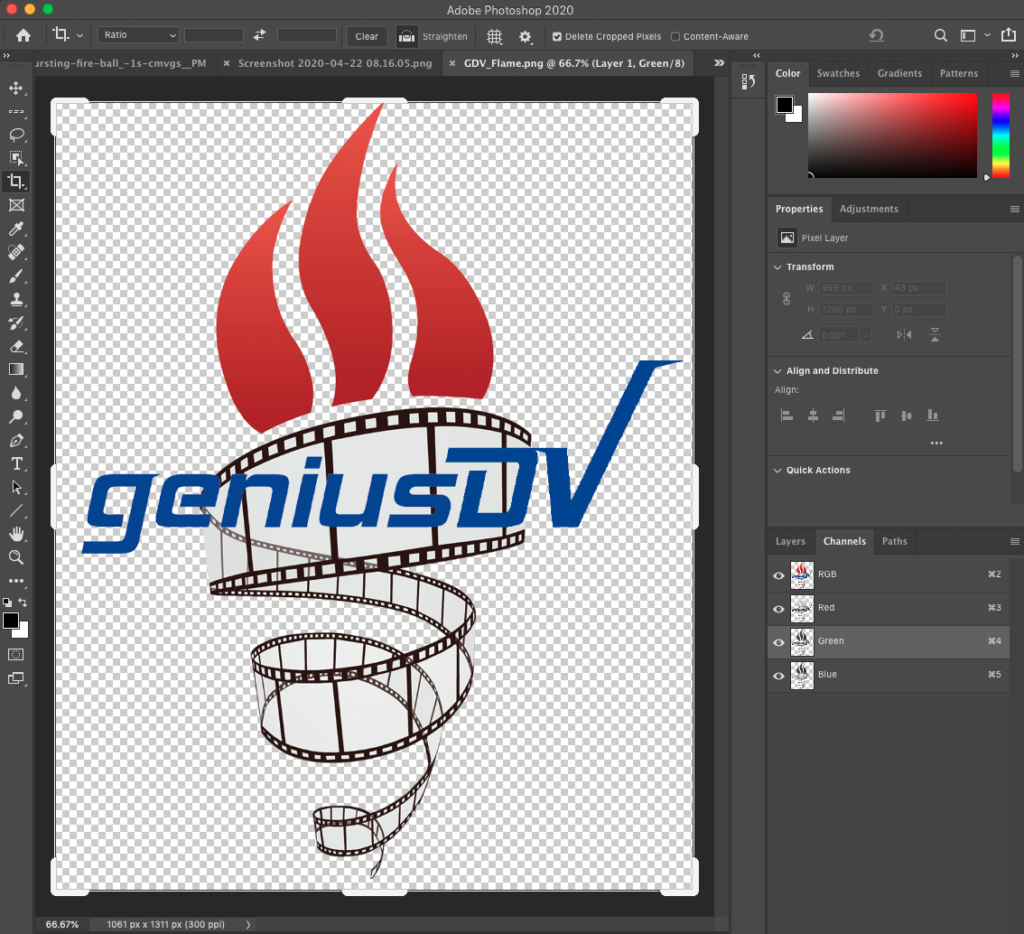
Click on Image and/or Link and then right click to save GeniusDV Logo with Alpha Channel
If you are new to the concept of blending modes, there are some great websites that explain in great detail on how powerful blending modes can be.
Blending modes were traditionally geared towards working with still images. However, they provide some amazing capabilities when used with video clips.
For compositing modes to work, you need some cool backgrounds that will affect the blend of the two video layers. Footage of Fire, Water, Clouds, and Lights make for great composites as a base layer.
You can download a Free Media Composer AVX Blending Mode plug-in that provides real-time blending modes within Avid Media Composer. There are no strings attached. Click on the link above and install the plugin.
After you install the Blending Mode AVX plug-in, make sure you restart Avid Media Composer.
I’ve tested the plugin with several versions of Avid Media Composer, including up until the 2020.4 beta.In the Blending Mode Tutorial, I’m using a graphic with an Alpha Channel. However, you can use any graphic and/or foreground to blend with a layer below it.
It’s easy to create dynamic effects using blending modes in Avid Media Composer.
Take a basic logo and turn it into something like this….. with just a few clicks.
A blending mode provides effect options for how a base layer, is affected from a layer directly below it. Blending modes requires at least two video layers.
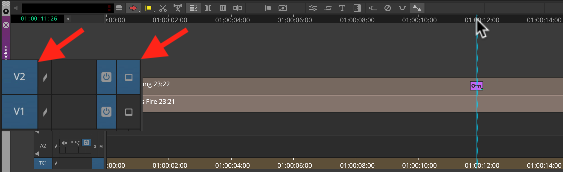
Edit any two clips directly on top of each other. Make sure the V2 sequence record track and the V2 Monitor Icon are both turned on in the timeline.
Two Video Tracks are Required with V2 track enabled along with Monitor Icon.
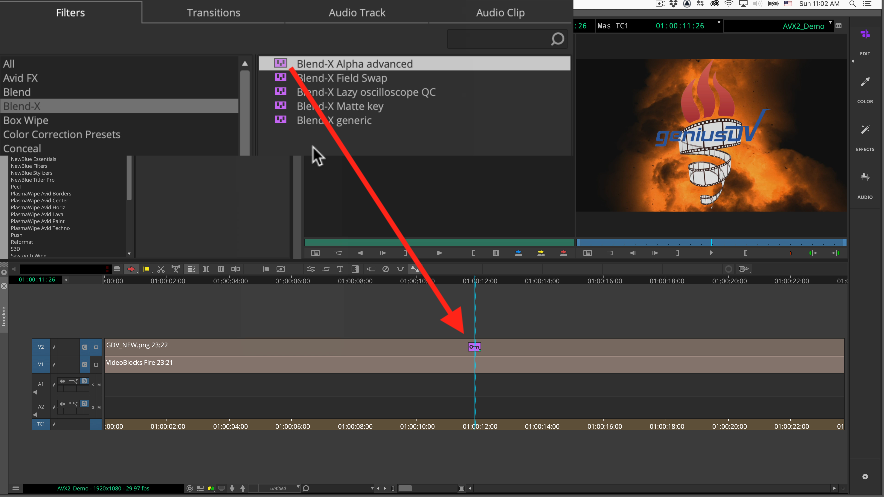
Next, drag the blend-x effect onto the V2 track. You can use either Blend X Generic, or Blend-X Alpha Advanced.
Use Blend-X Alpha Advanced if you are working with a graphic that contains an Alpha Channel. An Alpha channel means that your graphic or video clip contains areas that are transparent.
However, for this tutorial, DON’T worry, just edit ANY two clips directly on top of each other.
In General, Alpha Channels are shown as a checkerboard pattern that shows the transparent area.
If you’re not familiar with Alpha Channels, consider taking any Avid GeniusDV video editing course, and we will walk you through the process.
Navigate to the Tools menu and select the Effect Palette. Look for the Blend X category under the filters tab.
From the effect palette, drag the Blend-X Generic or Advanced plugin onto the clip segment that on V2.
Then click on the effect editor icon at the top of the timeline window. The icon looks like a pair of ‘seatbelts’.
Effect Editor Button
This will launch the Effect Editor Window.
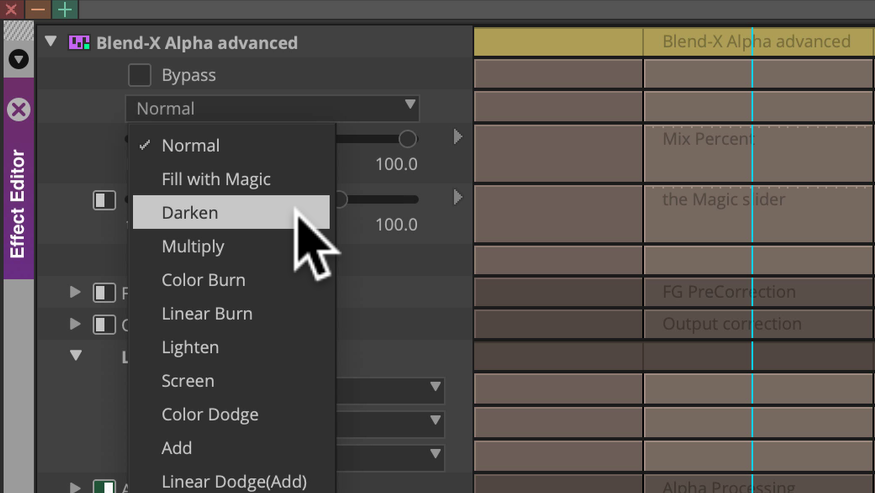
Within the Effect Editor Window, choose a blend mode. In this example, I chose Darken.
Choose a Blend Mode – Darken
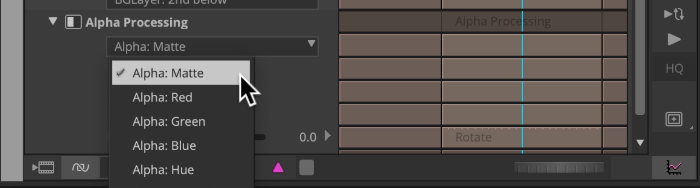
NOTE: If you are using a graphic with an alpha channel on V2, make sure you choose Alpha Matte from the Alpha Processing area.
Choose Alpha Matte from the Alpha Processing area within the Effect Editor Window
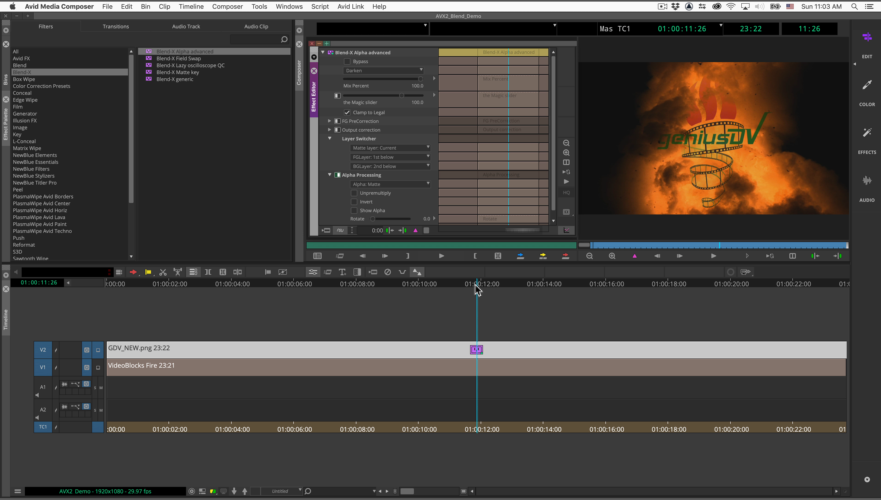
That’s it! It’s that simple. Here’s a still from the final result.
Final Result Using Blend Mode – Darken within Avid Media Composer
If you’re new to Media Composer 2019.X, there is a new feature where you can adjust fonts and font sizes for each individual primary Media Composer Windows.
You can now adjust the font type and size for The Composer Window, The Timeline Window, and the Bin Container Window.
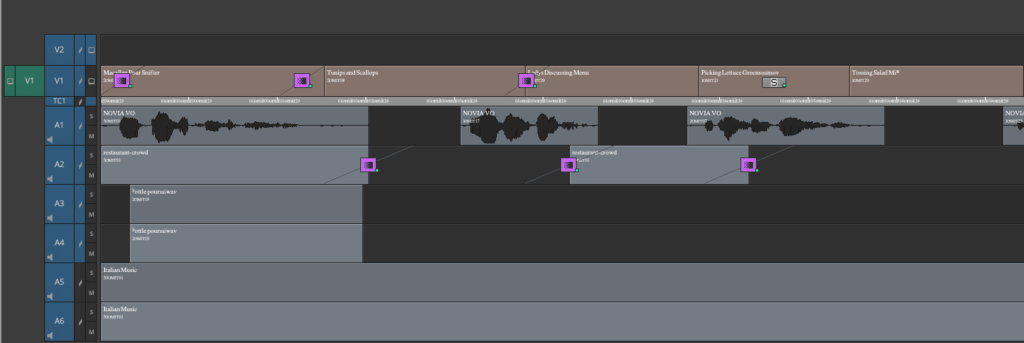
So for example, I recently upgraded Avid Media Composer System, and the fonts were too small to read within timeline window.
Super Small Fonts within Avid Media Composer Timeline
Select a primary Media Composer Window.
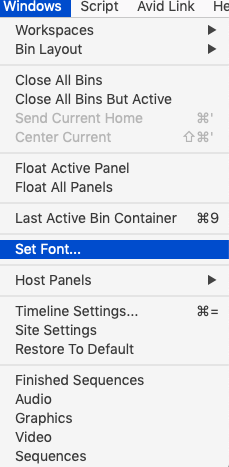
Navigate to the Windows Menu and Select Sent Font
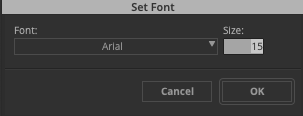
Choose a new Font (i.e, Arial) and a Font Size
Set Font Size for Media Composer WindowSet Font Type and Size for Avid Media Composer Timeline WindowAdjusted Font Sizes for Media Composer Timeline
Thanks to Avid for implementing features like this that don’t seem like much. But believe me, some time the most simple features go a long way in terms of improving efficiency.
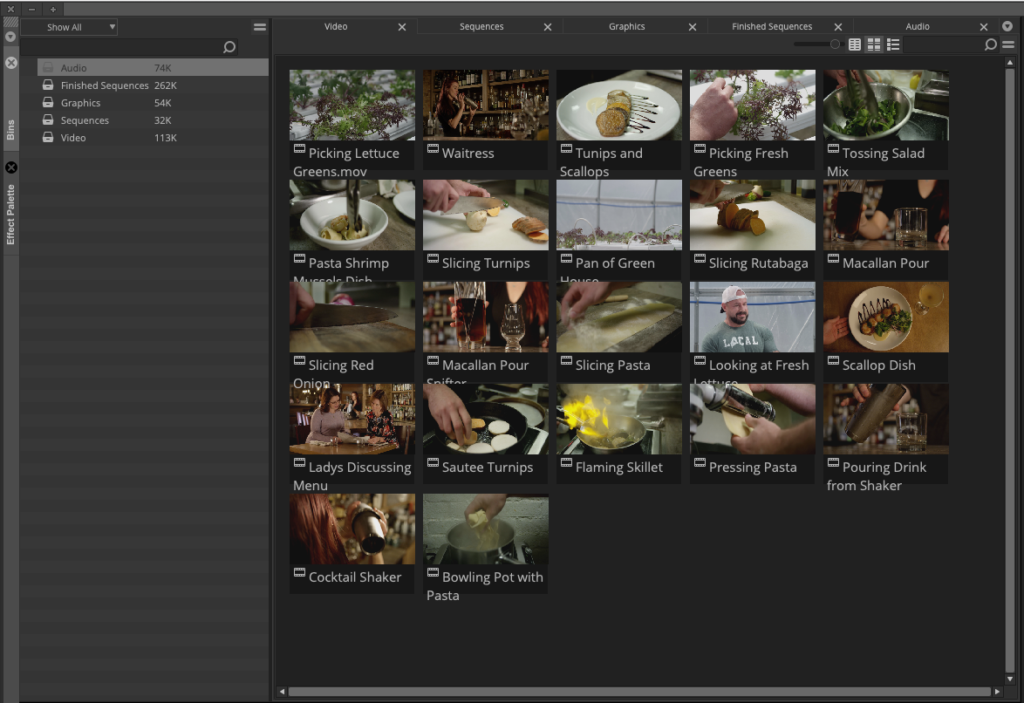
Learn the basics of using Bin Containers within Avid Media Composer.
Basic Introduction to Media Composer Bain Container
This tutorial video is a super basic introduction to using a bin container with Media Composer.
Here are a a couple of key features that may be foreign to even the most seasoned Avid user that hasn’t had the opportunity to upgrade to MC 2019
The is no longer a project window within Avid Media Composer
The Bin container is now the heart of of the software. You must always have at least one bin container open.
You can have multiple bin containers, but they are essentially clones of each other. This concept may seem odd. However, multiple bin containers may be useful for different container ‘views’
Also, it’s critical to understand the difference between dragging a floating window into the main interface panel, vs another window that already has a tab. So, that’s why I’ve reinforced the concept of holding down the alt/option key when dragging a floating panel into another window.
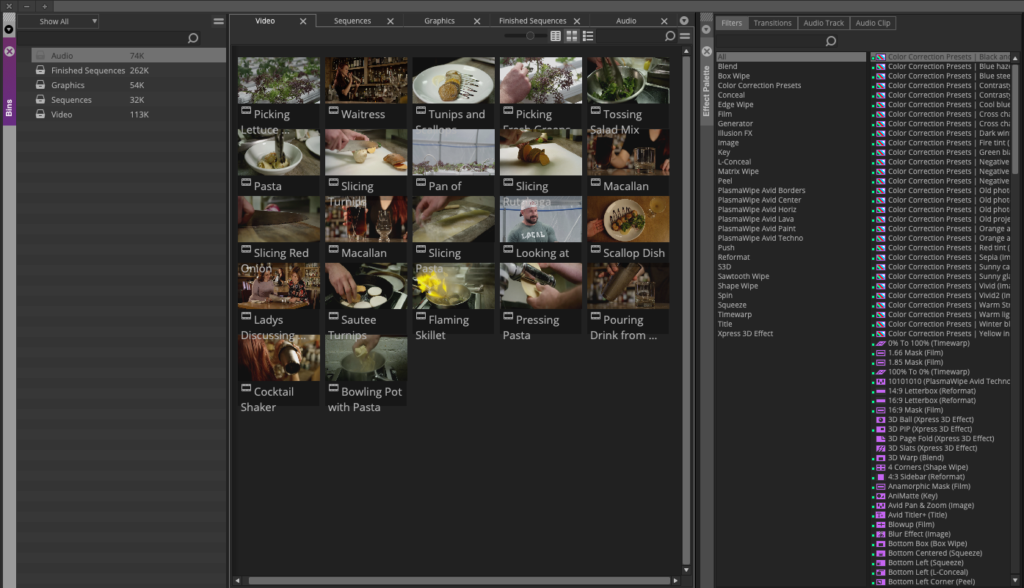
Hold down the ALT/OPTION key to attach multiple tabs to the same window. You will end up with something like this:
Multiple Tabs within ONE single bin container
If you don’t hold down the ALT/OPTION key when re-attaching to windows that already have a tab. You end up with something like this:
Multiple Windows INSIDE the same container
I’ve been using Avid Media Composer full time since 1992. I can see how this new interface will take seasoned Avid Editors awhile to get used to. The new Avid 2019 interface now looks more like DaVinci Resolve and Premiere.